
Blogger Image Gallery Tutorial
Do you want to create your own image gallery? You are in luck because today I am going to show you the tutorial on how to do this yourself. (Please note I am using the newer blogger interface. You can do the steps pretty much the same on the old interface, it will just look a little different.)
First, open your Blogger.com account. Then, click on your blog to take you to the ‘Overview’ page.
Click on the ‘Pages’ link.
From here you will either click on a page link you have already created or you can now create a new page. If you are adding the image gallery to a page you have already created, click on the Edit button under the category you want to edit. (In my example, I am editing the ‘Crafts’ page.)
From here you will click on the tab at the top that says ‘HTML’. You are going to be adding html code to this page. (Don’t worry. It isn’t too scary, I promise!)

You will enter the following code, changing the colored parts with the information from your blog you want to add to your particular image gallery.
<table cellpadding="3">
<tbody>
<tr>
<td align="center" width="25%"><a href="http://yourprojectposturl.com" target="_blank"> <img
src="http://yourimageurl.jpg" /><br>Name you want to have displayed below your image</a></td>
<td align="center" width="25%"><a href="http://yourprojectposturl.com" target="_blank"> <img
src="http://yourimageurl.jpg" /><br>Name you want to have displayed below your image</a></td>
<td align="center" width="25%"><a href="http://yourprojectposturl.com" target="_blank"> <img
src="http://yourimageurl.jpg" /><br>Name you want to have displayed below your image</a></td>
<td align="center" width="25%"><a href="http://yourprojectposturl.com" target="_blank"> <img
src="http://yourimageurl.jpg" /><br>Name you want to have displayed below your image</a></td>
</tr>
</table>
The first link you will change is the web address of the post you want to link to.
The second link will be the image url you want to have displayed.
The third area to change will be the words you want to have displayed below the image.
If you copy the above example exactly, it will give you one row with four images. To add more rows, you will want to copy the entire section from the <tr> to the </tr> to add more links and images. You will add this after the </tr> and before the </table>.
Some helpful tips:
- You are creating a table. Everything within the <table> and
</table> tags will be shown in that table. The <tr> tag is
for the row and the <td> is for each cell in the table.
- In all html you will have a start (or opening) tag and an end (or closing) tag. For example, to create a table you must have the tag <table> at the beginning and </table> at the end. If you are getting error messages, usually it is because you are missing an /,<, or >. You must check this carefully or your codes will not work!
- Since I chose to do four images, I created the width of the cell to
be 25%. I did not predefine the width to a particular number so that it
will always only take up 1/4 of the row width, regardless of how many
images are there and how big the browser window is. This way, when I do
not have all the cells filled out, it still only takes up the same
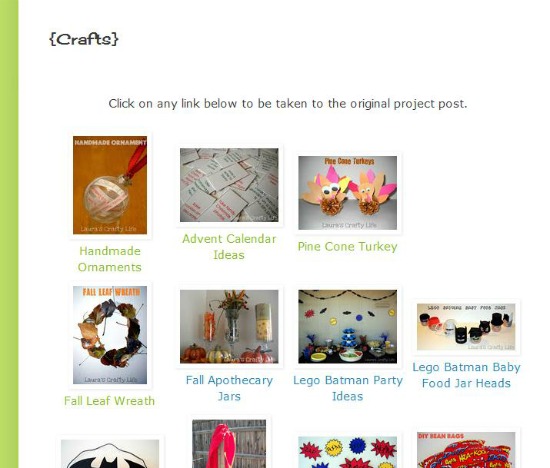
amount of space. You can see this in the very first picture in this
post. I only have three images in the first row.
- If you were to do three images you would make the width 33% instead.
- Likewise, if you choose to do five images, you would set the width at 20%.
If you open Picasa Web Albums and log in with the same log in you use for blogger, you will see your blogger account with all of your pictures.(Update: Blogger now uses Google+ to store your images.)- To get the image url, find the image you want, right click on the image and select ‘copy image url’. This will be what you will paste into the green link area in the above example. You do not have to resize the images or do anything further to make it work!
- If you are still stuck, I have found w3schools.com to be incredibly helpful for learning hmtl code. They have a section on creating tables that can help you if you are stuck.
- Flickr.com users: Because I have had so many questions regarding how to make an image gallery using Flickr images, I created a tutorial for how to find your image URL on Flickr.com. This should answer any questions you have.
** Update**
I use Google Chrome as my web browser. When I opened up my ‘Crafts’
page in Internet Explorer, the table was stretching over into my
sidebar. I finally found a fix to keep the table the same size in any
web broswer! Set your table width to about 50 – 100 pixels less than
your main column width of your blog.For example, my main section of my blog (where my post content shows up) is 800 pixels wide. So I set my table width to 700 pixels.
To do this, in the above code you would add width=”700″ into your table setting. Here is what it will look like:
<table cellpadding=”3″ width=”700″>
I hope that helps some of you out there that may be having trouble like I did. Also, be sure to check your blog in several web browsers – you may be surprised how different it can look!
http://www.laurascraftylife.com/2011/12/blogger-image-gallery-tutorial.html


